How to add a project to sync?
How can I add a Project to sync to SharePoint?
The Configuration tab is where you will add your projects from Procore and select the location in SharePoint you want to sync it to.

We have four methods to configure the projects.
1. Full Project Sync
2. Auto Project Sync
2. Auto Project Sync
3. Selected Folder Sync
4. Documents only Sync
1. Full Project Sync
Classic Method is useful when you have a few projects to add. With this method, you can add the projects one by one.
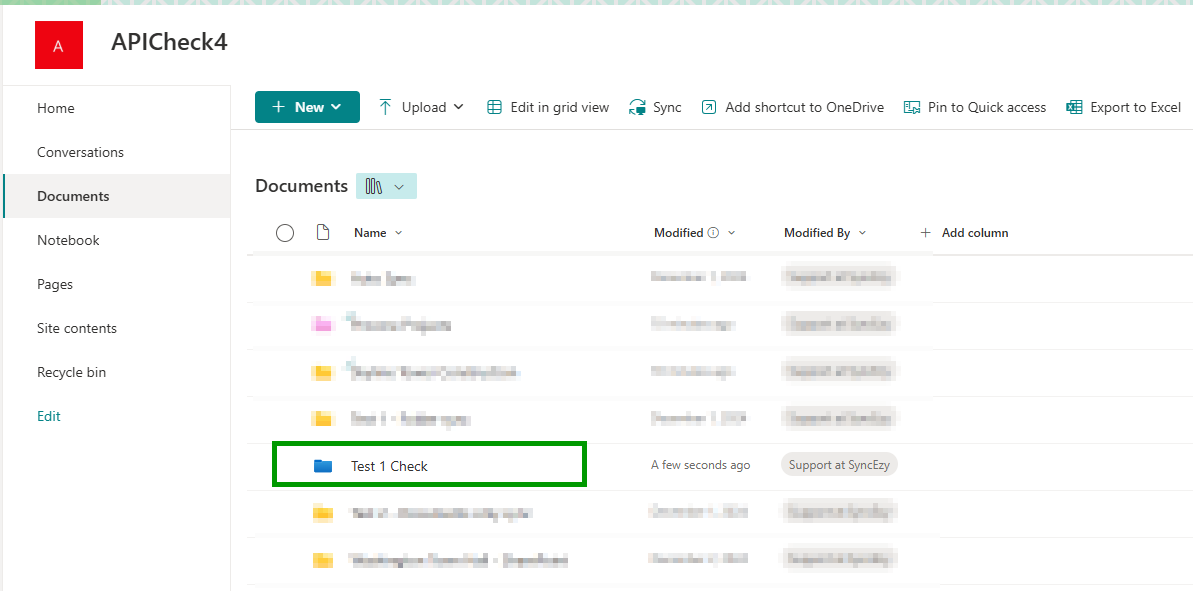
Prerequisite: Create a folder with the project name or any identical name in SharePoint where you would like to sync your project. (In this example we have created a folder with the Project name in SharePoint).
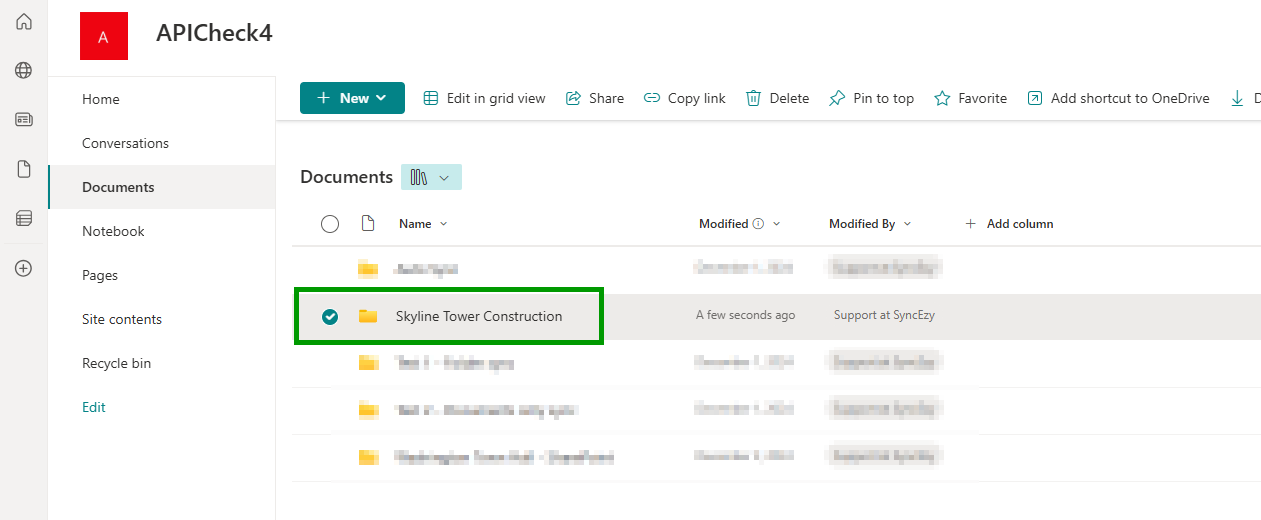
Once you have the folder created please refer to the steps below :
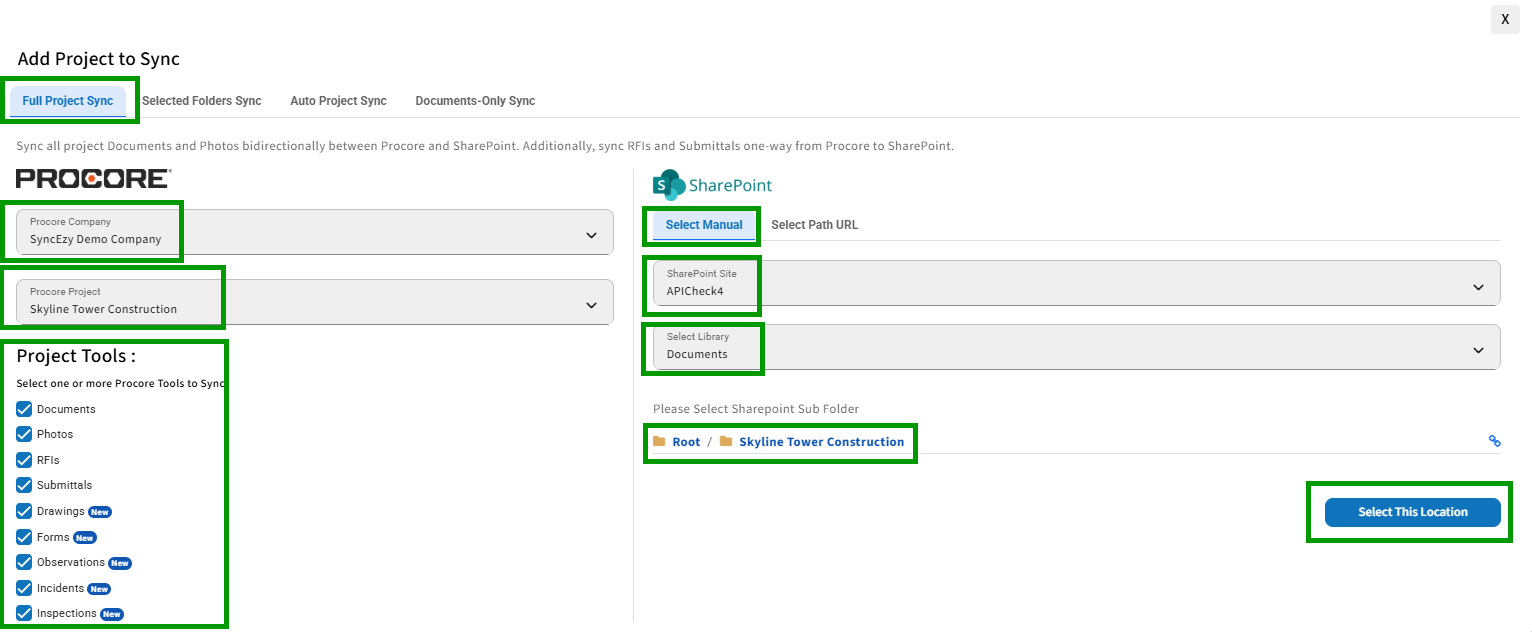
1. Click on the "Add Project to Sync" button under the Configuration tab in SyncEzy Portal.
2. In the window that pops up, choose your Procore company first
3. Select the Procore project from the list
4. In Project Tools, select whether you want to sync Documents, Photos, RFIs, Submittals ,Forms, Inspection , Incident, Observations, Drawings or all.
5. On the right-hand side, select your SharePoint Site and Library.
6. Navigate and select the folder you want to sync to. This is the folder that we created with the project name in SharePoint. Selected tools folder (Documents, Photos, RFIs, Inspection , Incident, Submittals ,Forms, Observations, Drawings) will be created on this location only to sync the data.
6. Navigate and select the folder you want to sync to. This is the folder that we created with the project name in SharePoint. Selected tools folder (Documents, Photos, RFIs, Inspection , Incident, Submittals ,Forms, Observations, Drawings) will be created on this location only to sync the data.
7. Click on "Select this location" to sync your Procore project files to the desired location.
8. Click on Add Project when you get the message "Path selected successfully".
Once you have clicked on "Add Project" your project will be added to the integration configuration and tools folders (Documents, Photos, RFIs, Inspection , Incident ,Submittals, Forms, Observations, Drawings) will be created in SharePoint under the chosen path folder during the initial sync and data from Procore tools will be synced to these folders. Please do not change/rename/move/delete these folders as the sync will break (Screenshot below). To learn more about path and folder structure please click here.
Please note that once you have added a project to integration, you will need to wait for the initial sync to be completed. Please do not make any changes within the Project while the initial sync is going on. Initial sync can take a few minutes (Normally 5-10 minutes, depending on the number of folder structures in your Procore Project. If the project size is big it can take upto 24-48 hours). Once the initial sync is completed then only you can add the data to either side to sync across. You will receive an email notification once the initial sync is completed for that particular added project. Meanwhile, you can add more projects to the configurations if you have any. For each and every project you will receive a separate email.
2. Auto Project Sync
Auto Sync method allows you to sync all your newly created Procore Projects to the SharePoint location automatically. Please note that this feature will only work if you have checked the box against "Enable Auto Sync". With enabling Auto Sync only new projects will be auto-synced when the cron runs overnight. So if you have existing projects to sync you can use "Show Advance Configuration Options" checkbox to sync them. Please note that if you wish to disable auto sync you will need to navigate to this tab again (Configuration- Auto Sync) and remove the checkbox to disable Auto Sync and then click on Save configuration button.
If you do not wish to enable Auto Sync you can simply select the Project location in SharePoint and then select the existing projects to sync to that location through "Show Advance Configuration Options".
If you do not wish to enable Auto Sync you can simply select the Project location in SharePoint and then select the existing projects to sync to that location through "Show Advance Configuration Options".
You can also select and configure multiple projects to the same location with this option as this it will create folders with the Project name in your chosen SharePoint location. Once you have added the Projects, your projects will be added and visible under the configuration tab within 30 seconds.
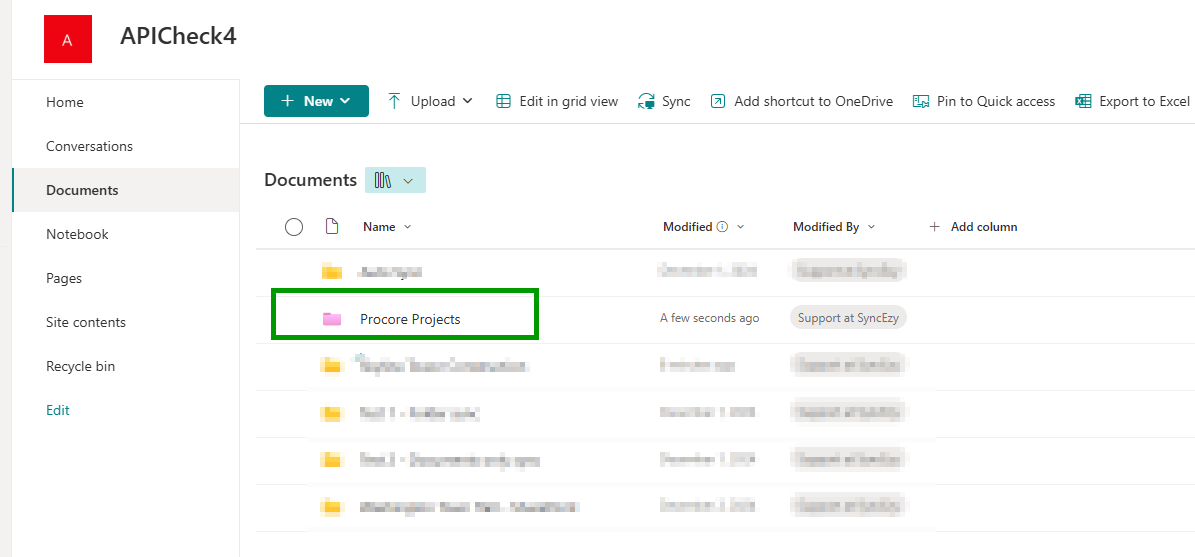
Prerequisite : Create a folder with the Procore Projects or any identical name in SharePoint where you would like to Auto Sync all of your projects. (In this example we have created a folder with the Procore Projects name in SharePoint).
Below are the steps to use Auto Sync :
Prerequisite : Create a folder with the Procore Projects or any identical name in SharePoint where you would like to Auto Sync all of your projects. (In this example we have created a folder with the Procore Projects name in SharePoint).
Below are the steps to use Auto Sync :
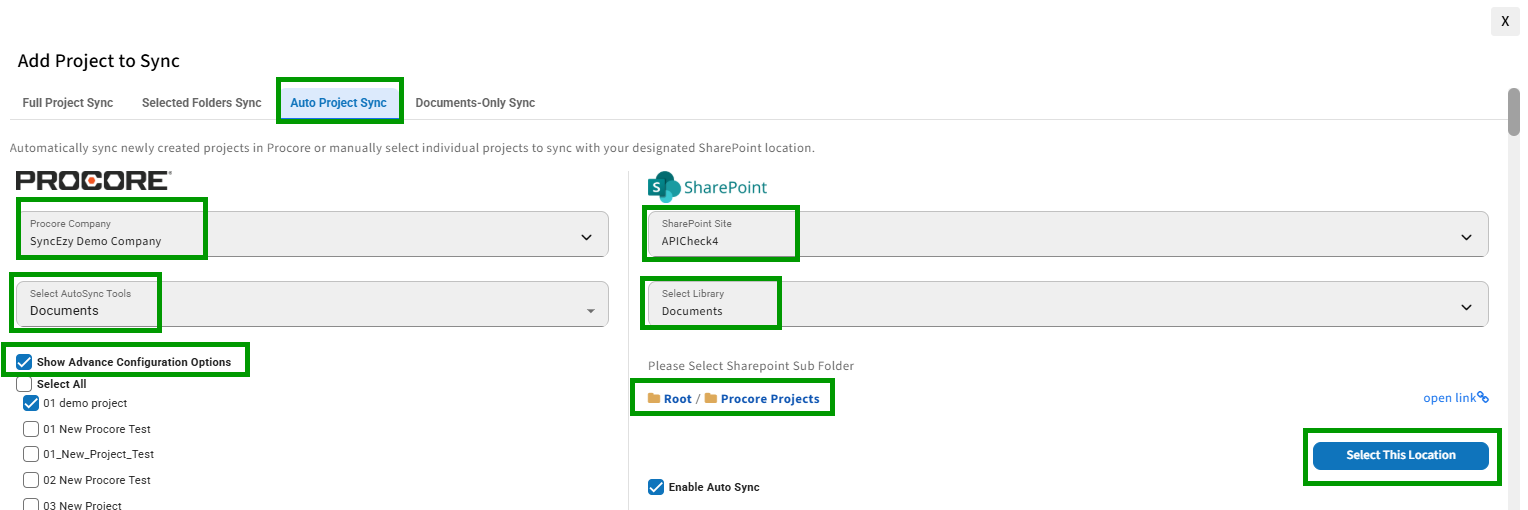
1. Click on the "Add Project to Sync" button under the Configuration tab
2. In the window that pops up, navigate to Auto Sync tab.
3. Select the Procore Company from the list
4. In Project Tools, select whether you want to sync Documents, Photos, RFIs, Submittals , Inspection , Incident ,Drawings, Forms, Observations, or all.
5. Select "Show Advance Configuration Options" if you have existing projects to add to the sync.
6. On the right hand side, select your SharePoint Site and Library.
7. Navigate to the folder you want to sync your existing or Auto sync your newly created projects. All the projects will be synced to your chosen location as this functionality will create the folders with the project name and then sync the data in it. In this example we are syncing all the Projects to the folder "Procore Projects" that we created in SharePoint.
8. Click on "Select this location" to sync your Procore project files to the desired location.
9. Select Enable Auto Sync (if you would like your new projects to be added to the configurations automatically)
10. Click on Save Configuration when you get the message "Path selected successfully". Please note we have selected 3 existing projects to sync and these will be synced to the folder "Procore Projects".
Upon selecting "Save Configurations" your current projects (we selected 3 in above example) will seamlessly integrate into the configuration. The integration will auto-generate folders named after your projects, each housing dedicated tool folders (Documents, Photos, RFIs, Inspection , Incident, Submittals, Drawings ,Forms, Observations) for example, refer to the screenshots below for Project 01 New Procore Test. All the newly created project will be auto added and synced to the selected location (Procore Project in this example) automatically in the same way. It's crucial not to modify, rename, relocate, or delete these folders, as doing so will disrupt the sync process.
Please note that once you have added a project to integration, you will need to wait for the initial sync to be completed. Please do not make any changes within the Project while the initial sync is going on. Initial sync can take a few minutes (Normally 5-10 minutes, depending on the number of folder structures in your Procore Project. If the project size is big it can take upto 24-48 hours). Once the initial sync is completed then only you can add the data to either side to sync across. You will receive an email notification once the initial sync is completed for a particular added project. For each and every project you will receive a separate email.
In future if you would like to change SharePoint location for your new projects, then location can be changed by navigating to (Configuration > Add Project to sync > Auto Sync) and then change the site/path folder if needed. As soon as you change the location, from that moment onwards all newly created Procore projects will be synced to the new SharePoint location. Any previously auto-synced project paths will remain unchanged and continue to sync normally.
3. Selected Folder Sync
This method allows you to sync multiple top-level folders from your Procore project to your chosen SharePoint location. This method is for those who do not wish to sync the whole project but like to sync one or multiple folders to SharePoint. You can add those folders by selecting the checkboxes and the folders will be synced to the SharePoint location. Currently, the Folder Sync method syncs the Documents tool only. Please note that only the top-level (Level 1) folders can be synced with this method.
Prerequisite: Create a folder with the project name or any identical name in SharePoint where you would like to sync the folders from project. (In this example we have created a folder with the Project name in SharePoint). You can also use an existing folder in SharePoint to sync folders from Procore.
Prerequisite: Create a folder with the project name or any identical name in SharePoint where you would like to sync the folders from project. (In this example we have created a folder with the Project name in SharePoint). You can also use an existing folder in SharePoint to sync folders from Procore.
Below are the steps to use Folder Sync :
1. Click on the "Add Project to Sync" button under the Configuration tab
2. In the window that pops up, navigate to Folder Sync tab.
3. Select the Procore Company from the list
4. Select the Procore project from the list
5. Select the folders from the list that you would like to sync to SharePoint and then click on Select this location. We have selected two folders to sync.
6. On the right-hand side, select your SharePoint Site and Library.
7. Navigate to the folder you want to sync to. Note: There will be a red text saying "You can't select this location" if you have selected an invalid location.
8. Click on "Select this location" to sync your Procore project folders to the desired location.
9. Click on Add Project when you get the message "Path selected successfully".
Once you click on "Add Project" the project will be added to the configurations and selected folders will be created in your chosen location in SharePoint. (Refer to the screenshot below)
Please note that once you have added a project to integration, you will need to wait for the initial sync to be completed. Please do not make any changes within the Project while the initial sync is going on. Initial sync can take a few minutes (Normally 5-10 minutes, depending on the number of folder structures in your Procore Project. If the project size is big it can take upto 24-48 hours). Once the initial sync is completed then only you can add the data to either side to sync across. You will receive an email notification once the initial sync is completed for a particular added project. For each and every project you will receive a separate email.
Please note that once you have added a project to integration, you will need to wait for the initial sync to be completed. Please do not make any changes within the Project while the initial sync is going on. Initial sync can take a few minutes (Normally 5-10 minutes, depending on the number of folder structures in your Procore Project. If the project size is big it can take upto 24-48 hours). Once the initial sync is completed then only you can add the data to either side to sync across. You will receive an email notification once the initial sync is completed for a particular added project. For each and every project you will receive a separate email.
Please note that in future if you would like select more folders from the existing added project or would like to sync the whole project then you will need to delete the existing configuration and re-add the project again.
4. Documents- Only Sync
We are excited to announce a new feature that enhances our integration with SharePoint. Now, instead of creating a new "Documents" folder layer, the integration will sync all folders from the documents tool directly to your chosen path in SharePoint, maintaining the original structure. This feature currently supports the Documents tool and allows seamless syncing of your Procore project folders to a selected SharePoint location.
Prerequisite:
Create a folder in SharePoint with the project name or any identifiable name where you want to sync your project.
Once you have the folder created please refer to the steps below :
1. Click on the "Add Project to Sync" button under the Configuration tab in SyncEzy Portal.
2. In the window that pops up, Select Documents-only Sync and then choose your Procore company first
3. Select the Procore project from the list
4. On the right-hand side, select your SharePoint Site and Library.
5. Navigate and select the folder you want to sync to. This is the folder that we created with the project name in SharePoint and all the folders from Procore Documents tool will sync here.
5. Navigate and select the folder you want to sync to. This is the folder that we created with the project name in SharePoint and all the folders from Procore Documents tool will sync here.
6. Click on "Select this location" to sync your Procore project files to the desired location and click on Add Project.
Once you have clicked on "Add Project" your project will be added to the integration configuration and folders from the Procore Documents tool will be created in SharePoint under the chosen path folder during the initial sync. Please do not change/rename/move/delete these folders as the sync will break. To learn more about path and folder structure please click here.
Please note that once you have added a project to integration, you will need to wait for the initial sync to be completed. Please do not make any changes within the Project while the initial sync is going on. Initial sync can take a few minutes (Normally 5-10 minutes, depending on the number of folder structures in your Procore Project. If the project size is big it can take upto 24-48 hours). Once the initial sync is completed then only you can add the data to either side to sync across. You will receive an email notification once the initial sync is completed for that particular added project. Meanwhile, you can add more projects to the configurations if you have any. For each and every project you will receive a separate email.
Please note that once you have added a project to integration, you will need to wait for the initial sync to be completed. Please do not make any changes within the Project while the initial sync is going on. Initial sync can take a few minutes (Normally 5-10 minutes, depending on the number of folder structures in your Procore Project. If the project size is big it can take upto 24-48 hours). Once the initial sync is completed then only you can add the data to either side to sync across. You will receive an email notification once the initial sync is completed for that particular added project. Meanwhile, you can add more projects to the configurations if you have any. For each and every project you will receive a separate email.
Other questions
Have a support question?
We offer three support channels:
Chat - Live Chat (24x5 support) from within your integration portal.
Phone - #1 for Support
AUS: +61 2 9136 9448
NZ: +64 9 303 2999
UK: +44 203 670 1109
US: +1 720 500 9302
Email - support@syncezy.com
Related Articles
How to add a project to sync?
How to add a project to sync? The Configuration tab is where you will add your projects from Procore and select the location in Dropbox you want to sync it to. Here's how it works: 1. Click on "Add Project to Sync" button 2. Choose your Procore ...How to add a project to sync?
How to add a project to sync? The Configuration tab is where you will add your projects from Procore and select the location in Google Drive you want to sync it to. 1. Click on the "Add Project to Sync" button 2. Choose your Procore company first. 3. ...How to add a project to sync?
How to add a project to sync? The Configuration tab is where you will add your projects and Company Documents from Procore and select the location in box you want to sync it to. Refer to the steps outlined below for adding a project, followed by ...How to add a project to sync?
Prerequisite: Before you start adding project on SyncEzy portal , Please make sure you have installed SyncEzy app from the Autodesk Marketplace in your Autodesk Forma (formerly Autodesk Construction Cloud) account. please review the following article ...Add-On Feature: Simpro–SharePoint Integration for Project Jobs
Add-On Feature: Simpro–SharePoint Integration for Project Jobs We’ve introduced a new add-on feature for the Simpro–SharePoint integration that allows you to sync additional job attachments to SharePoint. What’s Included With this add-on, you can: ...