Project Sync: Essential Permissions in SharePoint to Get Started
In SharePoint, permissions are crucial and have been consistent across various site types, including Office 365 Group Sites and Communication Sites. The concept is straightforward, with each site having three default security groups:
Site Owners: These users have full control, allowing them to perform all actions that Site Members and Site Visitors can, plus additional tasks such as maintaining site security, adding web parts, and managing navigation.
Site Members (Edit Permissions): Users in this group can add, edit, and delete content, including documents, pages, announcements, and events. They can also share content with others, in addition to having read and download permissions.
Site Visitors: This group comprises read-only users who can only view and download content from the site.
What permissions do I need in order to sync the data?
To sync the data, you must have one of the following:
- Be designated as a site owner
- Hold the role of a site member with Edit permissions or be part of the member group with Edit rights.
How to check and give permissions for any SharePoint site?
Once you click on this Member button, you will see a list of Owners and Members of this site, as shown in the screenshot below. If you do not see the user name here it is possible that user does not have access to this site.
To add a user you can click on Add Members button and send a invitation to user to be member of the site. Please note that this button will only be visible if you have the Owner access.
Enter the email address of the user and save the settings.+
You can also add users to the Site group by following the steps below.
Please note that after permissions are granted, it may take a few hours, up to 24 hours, for the SharePoint site to appear in the SyncEzy configuration dropdown. This delay occurs as the site is indexed by the SharePoint API
FAQs
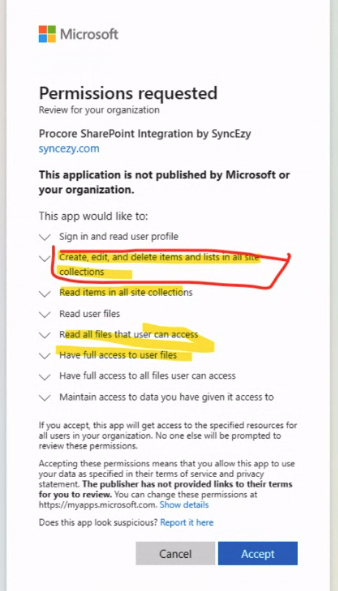
This one-time step is required to allow us to connect your company’s SharePoint account so you can then begin to connect project integrations. This is also a requirement so you can enable the sync to mirror the changes made in SharePoint/Teams Channels/OneDrive back to Procore after you set up an integration for a project. Without granting the integration the necessary permissions, it cannot function as intended.
SyncEzy will never have visibility of your Procore or SharePoint accounts. It is programmed so that after you connect you an integration in the “Configuration” tab (connect a Procore Project to a folder in a SharePoint site/Teams Channel), it will mirror any actions made by end users one either side in the connected folders only. We can never action (delete, edit, upload, etc.) any file or folder without the sync being triggered by an end-user on one side thus it facilitates automating version control throughout. If you have questions about activity done by SyncEzy on behalf of your team after an integration is set up, please use the 24/5 icon in the bottom right corner of your integration to connect with a Tech Specialist so you can screenshare and they can help you identify who made the changes in question. Still have questions? View the Technical Details article to see all answers to commonly asked questions about how the sync works here or ask your SyncEzy Solutions Consultant if you cannot find the answer you need.
Related Articles
Project Sync: Essential Permissions in SharePoint to Get Started
Essential SharePoint site permissions for syncing In SharePoint, permissions are crucial and have been consistent across various site types, including Office 365 Group Sites and Communication Sites. The concept is straightforward, with each site ...Project Sync: Essential Project Permissions in Procore to Get Started
Project Sync: Essential Project Permissions Required in Procore to Set-up your SyncEzy Account & Integrations To sync projects, the user credentials used to connect your Procore account in your SyncEzy integration need to have access to all the tools ...Essential Project Permissions in Autodesk Forma (formerly Autodesk Construction Cloud) to Get Started
Project Sync: Essential Project Permissions Required in Autodesk Forma (formerly Autodesk Construction Cloud) to Set-up your SyncEzy Account & Integrations For Project Sync: To sync projects, the user credentials used to connect your Autodesk Forma ...Project Sync: Essential Project Permissions in Procore to Get Started
Project Sync: Essential Project Permissions Required in Procore to Set-up your SyncEzy Account & Integrations To sync projects, the user credentials used to connect your Procore account in your SyncEzy integration need to have access to all the tools ...Project Sync: Essential Project Permissions in Procore to Get Started
Project Sync: Essential Project Permissions Required in Procore to Set-up your SyncEzy Account & Integrations To sync projects, the user credentials used to connect your Procore account in your SyncEzy integration need to have access to all the tools ...