Procore to SharePoint Integration Overview
Summary
This guide will give a detailed overview of the Procore SharePoint integration dashboard and reporting tools available.
Getting Started
Make sure you have the correct user credential permissions in Procore and SharePoint to setup up your SyncEzy integration account linking both company accounts in your SyncEzy portal.
Dashboard
The Dashboard tab provides a comprehensive overview of your connected projects and the health of your integration.
- App ID: Displays the unique App ID for your specific integration instance.
- Upgrade Message: This banner is visible only for accounts on the Free Plan. It will disappear once the user starts a 14-day trial or upgrades to a paid plan.
- Data Transfer Tracker: Visible only for Free Plan users. It allows you to track your current usage against the free plan limit. This bar disappears for paid plans, as they have no data transfer limits (depending on the chosen plan tier).
- Project Storage Usage: Displays a pie chart illustrating the storage size distribution across your actively syncing projects.
- Data Transfer Analytics: Shows the grand total of data transferred across all active projects, as well as the total volume of data deleted via the system for these projects.
- Actions: Lists your added projects alongside the size of their synced data. This section displays the Top 10 projects actively syncing in your account based on data size.
- Data Transfer History (Graph): Provides a visual representation of your data transfer history. You can filter the view by specific time ranges (12h, 24h, 2 Days, 1 Week, 1 Month) or select a date range to visualize the volume of data synced across your projects over time.
- Active Configuration: Lists the last 10 projects that have recently synced data, along with their latest sync timestamp.
- Procore Status button: Directly linked to the official Procore Status page. Clicking on this button, displays any current incidents or outages reported by Procore.
- Activity Logs: specific user actions within the portal, such as adding or removing projects, changing settings, or enabling/disabling specific options etc.
Details
1. Procore-Username
This is the email associated with the Procore account you connected.
2. SharePoint-Username
This is the email associated with the SharePoint account you connected.
3. SyncEzy-Email
This is the email you signed up with to access the integration portal on integrations.syncezy.com
4. Plan Details:
The Plan Details tab is a summary of your current subscription status. Below is a brief explanation of each text box.
- Customer Name: This is the name you signed up with on the integrations portal.
- Customer Email: This is the email you signed up with on the integrations portal
- Plan Name: This will always be Procore SharePoint Two Way.
- Plan Code: This is the code we use internally and it is related to the plan name.
- Plan Price: This will show the amount you paid for the integration, depending on the plan tier and how long you have chosen to subscribe for.
- Interval of Subscription and Interval - unit of subscription: These two fields are related and specify how many months or years you have opted to subscribe for.
- Next Bill Date: This field specifies the next date you will be billed for the subscription.
- Subscription ID and Subscription Number: These two fields are the references to your subscription. If you have any issues with your subscription, you can give either of these to SyncEzy's support team to help you check.
Configuration
Users can add project and company documents for syncing and view the list of projects that are actively syncing through this integration. The Configuration tab is where you add projects and Company Documents from Procore and select the SharePoint location where the data will be synced.
- Add project to sync : To add projects using one of configuration option available, use this button. Please refer to this article on how to add project to sync
- Add Company Documents to sync : To add Company documents to sync via this integration, use this button. Please refer to this article on how to add Company Documents to sync
- Configurations: List of actively syncing projects.
Click on Edit button at the right side of project to add / remove more tools.
Click on Delete button to remove the project from syncing (disconnect project from sync). It will not delete any data from any app , it will just remove project from sync.
File Manager
The "File Manager" tab offers a comprehensive view of files in both Procore and SharePoint, allowing easy navigation and management.
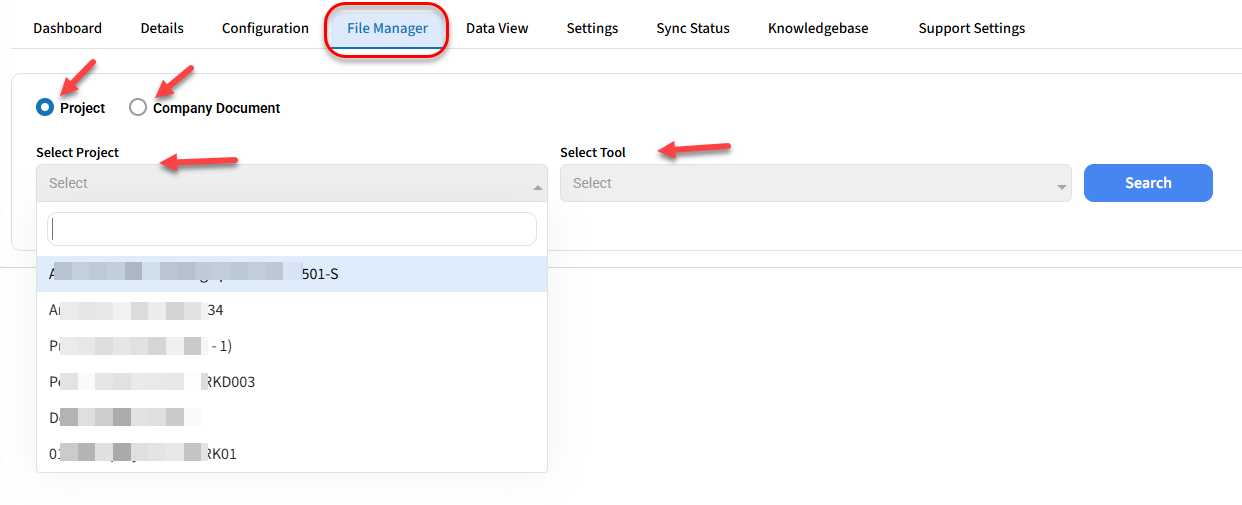
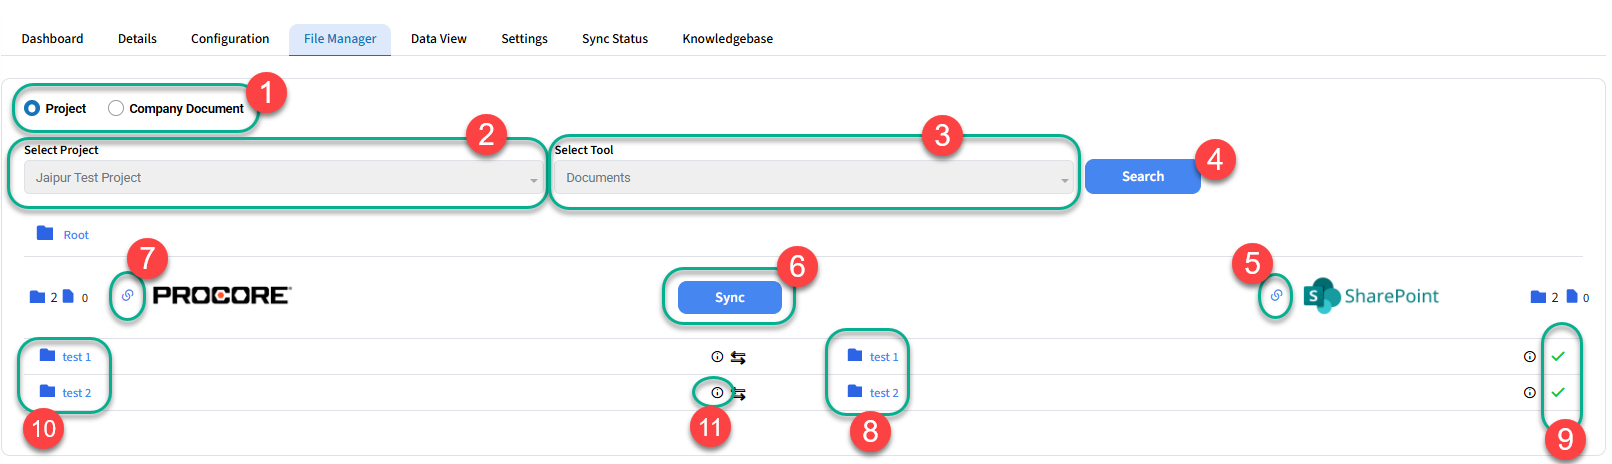
Here is an overview of the File Manager menu, based on the screenshot below.
Here is an overview of the File Manager menu, based on the screenshot below.
1 - Select whether you wish to view files/folders for your projects or Company level documents
2 - This is a dropdown list of all the projects/companies (for company-level documents) you configured and added to the integration.
3 - Select whether you want to view Documents, Photos, RFIs Drawings, Forms, Observations Inspection , Incident or Submittals, and then press Search to load the results. (This is applicable for the projects only, as for company-level documents there is no Photos, RFIs tool)
4- Click the button to show Procore and SharePoint side view selecting project and tools.
5 - This link provides direct access to the SharePoint location where syncing folders and files for the current navigated level are stored.
6 - This button will allow you to sync ONLY the files and folders in the navigated level. Child and parent files/folders will not sync when this is pressed.
7 - This link provides direct access to the Procore location where syncing folders and files for the current navigated level are stored.
8 - The right side is a list and count of all files and folders in the SharePoint location.
9 - The left side is a list and count of all files and folders in the Procore Project.
10 - The green tick marks indicate that the files/folders are synced and matching between both systems. If it is not matching or synced, it will appear with a red cross and the text in either the Procore or SharePoint side will be greyed out.
11 - Clicking on this small circled "i" shows the sync history of specific data item.
Data View
Data view tables
The Data View tab is all of the data SyncEzy has stored historically from a compliance perspective and you can export into an excel spreadsheet if required. The integration is programmed to alert your admin(s) of any pertinent actions needed to be taken if there's ever an issue created by an end user so you will not need to be searching in the reporting on a daily basis. If you have questions on any of these reports as they are developer-friendly for referencing, please use the 24/5 icon and start a chat with a Tech Specialist from our Support Team for clarification. You can screenshare with our Tech Specialists to walk them through any questions you may have as well in your Procore or SharePoint accounts regarding end user activities, etc.
Skipped Files section
Shows the list of all files that were skipped from syncing due to size being larger than 955 MB. Integration do not allow files more than 955 MB to sync. Please refer to this article for more information
Delete Confirmation review section
It shows the list of files pending to be deleted , if Delete Confirmation option is enabled from Settings tab. For more information on this table and associated feature, please refer to this article
Settings
It will allow user to manage all sync related settings related to this integration.
1. Integration Name
This setting is to give a custom name to your integration. Click on the pencil icon to edit and click save when you are done. You can enter 70 characters maximum.
2. Notification Email
Enabling this option will send you an email to the SyncEzy-Email about the sync status.
Add emails to receive notifications in the text box under this option. Multiple emails can be added. Separate each email with a comma, like: mail@example.com, mail2@example.com.
3. Sync Options :
App Owners can choose what options are selectable during Sync. Basically the APP Owner can enable/disable the sync methods and features. Please note these toggles are visible to APP Owner only.
A to H - File name Customization: Allows users to customize the file naming convention when syncing files from the Procore tool to SharePoint. For more information please visit this article :Custom File Name Structure for One-Way Sync Tools
B- Configuration Method Controls: Provides options to enable or disable specific methods for adding projects to the sync.
4. Email Statistics
If enabled, the system will send automated email notifications providing a summary of data synced and the overall health of the integration.
Users can choose how often they receive these reports (Daily, Weekly, or Monthly) by selecting one of the following options 1D: Daily 1W: Weekly 1M: Monthly
5. Special Characters
The Procore-SharePoint sync does not allow special characters in the naming. Enabling this option allows us to replace these Special Characters in the Procore Photos tool Album names from # % * : < > ? / \ | ~ " to Hyphen '-'. You may face errors while syncing if you add any of these special characters in Procore or SharePoint and if this option is disabled. This feature works for the Photos tool only as Procore itself cleans up the special characters for the Documents tool whereas in the Photos tool, they allow special characters.
6. Upload test file setting:
By default, this setting is enabled. When enabled, the system periodically uploads a temporary test file to your projects to verify connection health and validate permissions (ensure the system can read, write, and delete files). These test files are small (1KB) text files with a unique SyncEzy filename. They are automatically deleted by the system immediately after the health check is performed. This setting can be disabled by the user. However, we recommend keeping it enabled. Disabling it limits the system's ability to proactively detect specific errors (such as root folder error) and prevents automatic notifications regarding these issues.
7. Delete Confirmation
When enabled, this safety feature prevents the system from automatically syncing deletions between applications.
If a file or folder is deleted in one app, the deletion will not be replicated to the other app immediately. Instead, the action is paused until a user manually confirms it within the SyncEzy portal. ot sync any delete action from one app to other until confirmed by user from the portal .
For a full guide on this feature and how to manage these pending deletions, please refer to this Knowledge Base Article
8. Sync Deletes
Enabling this option will allow end users to delete files from either system and the sync will mirror those deletions provided the files/folders are within your syncing folders as set up in the configuration step. If you delete a file from Procore, it will delete it from SharePoint. If you delete a file from SharePoint, it will delete it from Procore. If this option is disabled, deleted files will not be synced and you will have to manually remove it from the other system. You can increase or decrease the limit by inputing the limit you want and clicking save. Once the limit is hit, the sync will not delete any more files and the sync will email the SyncEzy admin with the path of the files not deleted. The Sync deletes limit will reset after 24 hours. Please note that the 24-hour deletion limit reset is based on the file deletion time, which means the 24-hour starts from the time you have deleted the file. The important thing to note is that, currently this feature works within the "Documents" tool only.
Please note: For example, if this feature is enabled and your sync delete limit is set to 25 in 24 hours and you have deleted 100 files from SharePoint, the deletion of 25 files only will be synced back to Procore. This means those 25 files only will be deleted from both applications (you are syncing your deletes). However, the deletion of the remaining 75 files will remain unsynced in Procore unless those files are deleted manually from Procore. These 75 files will be shown as unsynced when you check the File Manager in your SyncEzy Integration Portal. To avoid this we recommend you to increase the Sync Delete limit to 10000 or more. The deletion limit can be changed in the Details menu.
Please note: For example, if this feature is enabled and your sync delete limit is set to 25 in 24 hours and you have deleted 100 files from SharePoint, the deletion of 25 files only will be synced back to Procore. This means those 25 files only will be deleted from both applications (you are syncing your deletes). However, the deletion of the remaining 75 files will remain unsynced in Procore unless those files are deleted manually from Procore. These 75 files will be shown as unsynced when you check the File Manager in your SyncEzy Integration Portal. To avoid this we recommend you to increase the Sync Delete limit to 10000 or more. The deletion limit can be changed in the Details menu.
Be sure to review this article and share with your end users so all team members are clear on how this functions to avoid accidental unintended syncing of deletions.
9. Multiple Procore Account Authentication
This feature is designed for users with exceptionally large datasets (typically exceeding 2TB+/ 100,000+ data items) who frequently encounter API rate limits.
Why is this needed? As a Procore Partner, SyncEzy utilizes one of the highest available API call tiers. However, when syncing massive amounts of data, even these high limits can occasionally be reached. This feature provides a failover solution to ensure continuous syncing.
How it works: Users can authenticate a Secondary Procore Account within the system.
If the Primary User hits the Procore API call limit, the system automatically switches to the Secondary User to continue processing changes.
Once the API limit for the Primary User resets (usually after a few hours), the system automatically reverts to using the Primary User.
Audit Trail Note: When the system switches to the secondary account, any changes synced to Procore will appear in the logs as "Modified by [Secondary User Name]." Once the limit resets, the logs will return to showing the Primary User's name.
Critical Requirement: For this feature to work, the Secondary User must have the exact same permissions and access levels (for both existing and future projects) as the Primary User.
⚠️ Beta Warning: This feature is currently in the Beta / Development stage. We strongly recommend contacting SyncEzy Support for guidance before enabling this feature to ensure it is the right solution for your specific environment.
More Information: Please refer to this Article for further details.
Sync Status
You can view the sync status in this tab - success or failure. The sync runs every day and you will be able to see when it starts and when it completes.
Please find following a video showing detailed instructions on how to use this feature:
Other Questions
View Frequently Asked Questions
You can view our Procore to SharePoint-related FAQs from here.
Have a support question?
We offer three support channels:
Chat - Live Chat (24x5 support) from within your integration portal.
Phone - #1 for Support
AUS: +61 2 9136 9448
NZ: +64 9 303 2999
UK: +44 203 670 1109
US: +1 720 500 9302
Email - support@syncezy.com
Related Articles
Procore to SharePoint 2-way integration feature updates 2023
Procore to SharePoint Integration Feature Updates Greetings from SyncEzy, We are excited to share with you an overview of feature updates for your Procore to SharePoint 2-way integration. These integration feature updates are designed to ensure you ...Procore to Dropbox 2-way integration FAQs
This document addresses the variety of questions we encounter while helping clients. If you have a question that’s not addressed her please write to us at support@syncezy.com About the Procore to Dropbox integration Please also visit our Integration ...Delete Confirmation Feature in Procore-SharePoint Integration
Overview The Delete Confirmation feature is an essential tool for managing deletions between Procore and SharePoint. When activated, it provides users with a convenient and secure way to review and confirm file deletions, ensuring that no critical ...Procore to OneDrive integration FAQs
This document addresses the variety of questions we encounter while helping clients. If you have a question that’s not addressed her please write to us at support@syncezy.com About the Procore to OneDrive integration Please also visit our Integration ...Procore to SharePoint Two-way Integration: Set-up your SyncEzy Account & FAQs
This document addresses the variety of questions we encounter while helping clients. If you have a question that’s not addressed her please write to us at support@syncezy.com About the Procore to SharePoint integration Please also visit our ...