Procore to OneDrive (One-Way) Integration Overview
Summary
This guide will give a detailed overview of every section and tab that you can find in your Procore to OneDrive integration. This is applicable for both one-way and two-way syncs.
Details
SyncEzy-Email
This is the email you signed up with to access the integration portal on integrations.syncezy.com
Procore-Username
This is the email associated with the Procore account you connected.
OneDrive-Username
This is the email associated with the OneDrive account you connected.
Integration Name
This setting is to give a custom name to your integration. Click on the pencil icon to edit and click save when you are done. You can enter 70 characters maximum.
Notification Email
Enabling this option will send you an email to the SyncEzy-Email about the sync status. Click on the pencil icon to edit the email and click save when you are done.
Data View
In the Data view tab, you can view data related to the Procore to OneDrive sync. You can also export them as an Excel spreadsheet.
Sync Status
In this tab, you can view the sync status - success or failure. The sync runs everyday and you will be able to see when it starts and when it completes.
Configuration
Under configuration tab you can set up your projects that you would like sync to OneDrive. There are two option to configure projects sync.
1. AutoSync - Turning on AutoSync toggle will import and sync all of your Procore projects automatically.
1. AutoSync - Turning on AutoSync toggle will import and sync all of your Procore projects automatically.
2. Manual Configuration - You can configure the projects manually by clicking on Add New --> Select Procore Company --> Select Procore Project --> Select tool Documents/Photos and then click on Save Changes button to save the project.
Storage Configuration

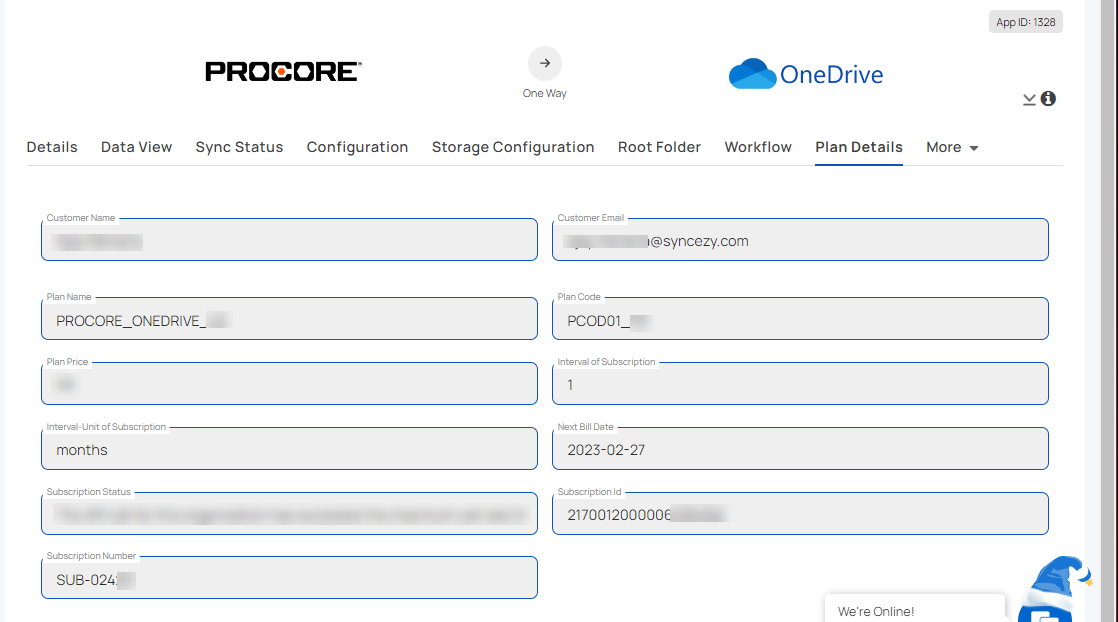
Plan Details

Customer Name
Customer Email
Plan Name
Plan Code
Plan Price
Interval of Subscription and Interval - unit of subscription
Next Bill Date
Subscription Status
Subscription ID and Subscription Number
FAQ
Have a support question?
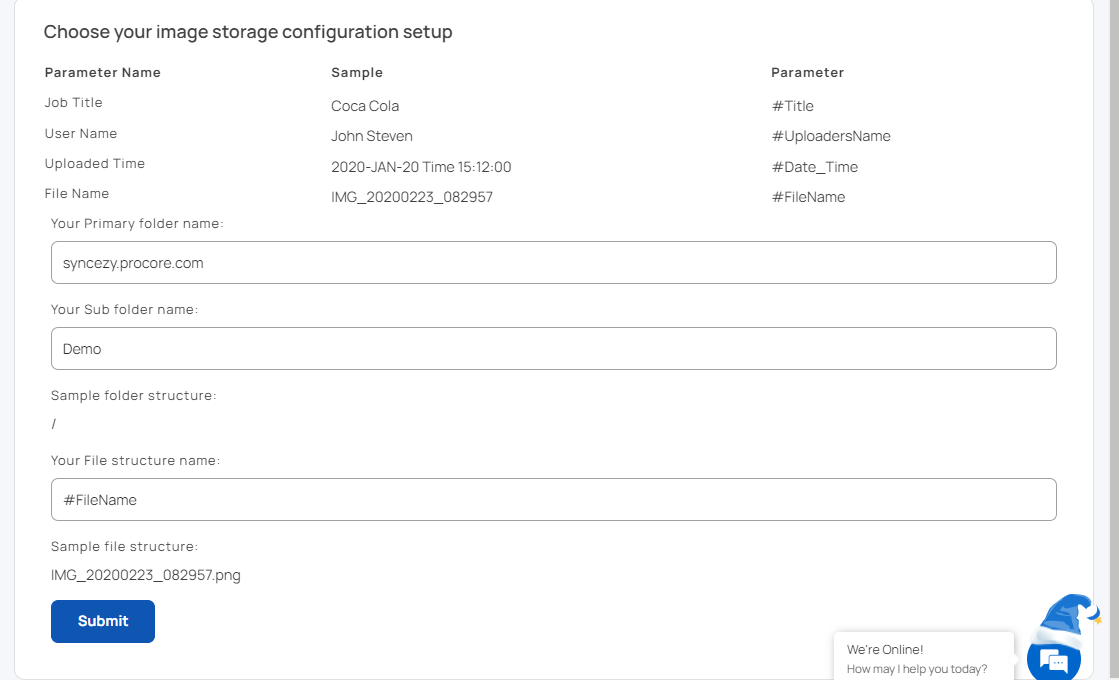
Storage Configuration

This is where you setup the destination folder for OneDrive in order to sync the data from Procore.
Your Primary folder name : This is Top level folder in which all the files will be Syncing. You may rename this folder at the time of Integration setup if you wish to.
Your Sub folder name: This will be the folder under the Primary folder. You may rename this folder at the time of Integration setup if you wish to.
File structure name: You can provide a fixed file structure naming to all your files from Procore to OneDrive. You can also add four dynamic values - Title, Uploaders Name, Date and Time of upload, File Name. The parameters are given in the top left corner.
Example: You want the file name to be the uploader's name and file name. In QuickBooks Time, the file name is 1234 and the uploader is John. So if you write #FileName_#UploadersName, the file name in OneDrive will be 1234_John
Root Folder
This is where you can rename the root folder name in which all the data is syncing.
Plan Details
The Plan Details tab is a summary of your current subscription status. Below is a brief explanation of each text box.
Customer Name
This is the name you signed up with on the integrations portal.
Customer Email
This is the email you signed up with on the integrations portal
Plan Name
This will always be the Integration name you purchased.
Plan Code
This is the code we use internally and it is related to the plan name.
Plan Price
This will show the amount you paid for the integration, depending on the plan tier and how long you have chosen to subscribe for.
Interval of Subscription and Interval - unit of subscription
These two fields are related and specify how many months or years you have opted to subscribe for.
Next Bill Date
This field specifies the next date you will be billed for the subscription.
Subscription Status
This field specifies whether your integration is live/trial or in other status.
Subscription ID and Subscription Number
These two fields are the references to your subscription. If you have any issues with your subscription, you can give either of these to SyncEzy's support team to help you check.
FAQ
The FAQ tab is a button that will link you to the Procore to OneDrive FAQ document.
Have a support question?
We offer three support channels:
Chat - Live Chat (24x5 support) from within your integration portal.
Phone - # 1 for Support
AUS: +61 2 9136 9448
NZ: +64 9 303 2999
UK: +44 203 670 1109
US: +1 720 500 9302
Email - support@syncezy.com
Related Articles
Procore to Dropbox 2-way integration FAQs
This document addresses the variety of questions we encounter while helping clients. If you have a question that’s not addressed her please write to us at support@syncezy.com About the Procore to Dropbox integration Please also visit our Integration ...Procore to box 2-way Integration FAQs
About the Procore to box 2-way Integration This document addresses the variety of questions we encounter while helping clients. If you have a question that’s not addressed her please write to us at support@syncezy.com Please also visit our ...Procore to Google Drive 2-way Integration FAQs
About the Procore to Google Drive 2-way Integration This document addresses the variety of questions we encounter while helping clients. If you have a question that’s not addressed her please write to us at support@syncezy.com Please also visit our ...Procore to SharePoint Two-way Integration: Set-up your SyncEzy Account & FAQs
This document addresses the variety of questions we encounter while helping clients. If you have a question that’s not addressed her please write to us at support@syncezy.com About the Procore to SharePoint integration Please also visit our ...Procore to SharePoint 2-way integration feature updates 2023
Procore to SharePoint Integration Feature Updates Greetings from SyncEzy, We are excited to share with you an overview of feature updates for your Procore to SharePoint 2-way integration. These integration feature updates are designed to ensure you ...